Audience: CMS Users, Event Organizers
Use the ScholarOne API import to bring sessions, speakers, and abstracts into the Conference App Builder. Set up a separate import source for each data set so you can map, troubleshoot, and reimport it independently.
Before you begin
Ask ScholarOne for these API credentials:
- API Username
- API Password
- Site Name
Use the Conference App Builder page that owns each data set:
- Agenda > Sessions for parent sessions and presentations
- Agenda > Speakers for presenters, chairs, hosts, and optional co-authors
- Media > Media Data for abstracts
If your project has used a customized ScholarOne import before, ask your ATIV Project Manager whether you need a Customization Code or Custom Import Parameters. The Customization Code is generally your organization ID in the Conference App Builder. Do not add either value unless ATIV confirms it.
Set up the initial import sources
Speakers
- Access the Conference App Builder. From the ATIV website, choose Organizer Login > EventPilot.
- Select your project.
- Go to Agenda > Speakers.
- Select Add Import Source. You may need to expand the import card first.
- Enter a recognizable source name, such as S1 Speakers.
- Select ScholarOne from Source, then select Next.
- Enter the API Username, API Password, and Site Name.
- Add the Customization Code only if ATIV supplied it. This is generally your organization ID in the Conference App Builder. Use Custom Import Parameters only when ATIV provides the exact value.
- Choose the speaker options:
- Include Co-authors: select Yes to create speaker records for co-authors. Select No to import presenters and session hosts only.
- Valid Invitation Statuses (optional): leave this blank to use the default Accepted behavior. Add exact ScholarOne statuses, such as Incomplete Accepted, only when additional presenters or hosts should be included. Use the same values in the Sessions source.
- Select Next and complete the field mapping. Common mappings include:
idto Speaker IDfirst_nameto First Namelast_nameto Last Nametitleto Titledegreeto Degreeinstitutionto Organization. ScholarOne supplies this from the person's institution and department.countryto Countryemailto Private Emailbioto Biomediato Media Itemsrolesto a filter or metadata field when attendees should be able to filter speakers by role
- Select Next to run the import.
Sessions
- Go to Agenda > Sessions.
- Select Add Import Source. You may need to expand the import card first.
- Enter a recognizable source name, such as S1 Sessions.
- Select ScholarOne from Source, then select Next.
- Enter the API Username, API Password, and Site Name.
- Add the Customization Code only if ATIV supplied it. This is generally your organization ID in the Conference App Builder. Use Custom Import Parameters only when ATIV provides the exact value.
- Choose the session options:
- Display Authors: select Yes to include presentation author names in child-session descriptions. Select No to omit the author block.
- Display FinalID: select Yes to place the ScholarOne
finalIdbefore child-session titles, for example<finalId>: <title>. Select No to use the title without this prefix. - Display Session Abbr.: select Yes to place the ScholarOne
sessionAbbrbefore parent-session titles. Select No to use the title without this prefix. - Show Location: select Yes to repeat the location in session descriptions. Select No when the normal Location field is sufficient.
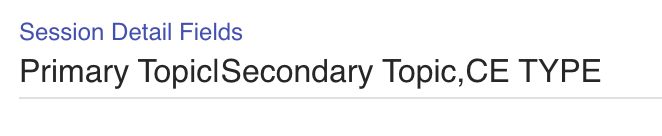
- Session Detail Fields (optional): enter exact ScholarOne field names separated by commas. Use a pipe to combine fields into one output column. For example,
Primary Topic|Secondary Topic,CE TYPEcombines both topic values into one column and creates a separate CE TYPE column. - Valid Invitation Statuses (optional): leave this blank for Accepted only. When you add another exact status, enter the same value in the Speakers source.
- Select Next and complete the field mapping. Common mappings include:
sessionIdto Session IDsessionNumberto Session Numberparentto Parent Sessiontitleto Session Titledescriptionto DescriptionsessionTypeto Session TypesessionTrackto Track or the appropriate filter fielddateto Datestartto Start Timestopto End Timelocationto Locationspeakersto Speaker IDmediato Media Items- Fields added through Session Detail Fields to the appropriate filter or metadata fields
- If
descriptioncontains supported math in a 9.3.9-or-later project, add the HTML and then Render LaTeX Math and Chemistry operations to that mapping. - Select Next to run the import.
If the import reports excluded rows or invalid data, review Common Conference App Builder Import Data Errors and Import Exclusion Reasons.
Abstracts (Media)
- Go to Media > Media Data.
- Select Add Import Source. You may need to expand the import card first.
- Enter a recognizable source name, such as S1 Abstracts.
- Select ScholarOne from Source, then select Next.
- Enter the API Username, API Password, and Site Name.
- Add the Customization Code only if ATIV supplied it. This is generally your organization ID in the Conference App Builder. Use Custom Import Parameters only when ATIV provides the exact value.
- Set Include Abstract Buttons to Yes when the abstract should include View Presentation and Add to Schedule buttons. Select No when those actions should not appear. These buttons are commonly useful in LITE projects and other projects with restricted schedule workflows because the abstract provides direct navigation and schedule actions.
- Select Next and complete the field mapping. Common mappings include:
mediaidto Media IDsessionidto Session IDtitleto Titletypeto Media Typedescriptionto Description. ScholarOne author-affiliation data builds the superscripted author and affiliation block in the abstract.urlto URLiconto HTML Iconcategoryto Filter 1 when attendees should filter by abstract categorysbucategoryto Filter 2 when attendees should filter by abstract subcategorydefaultFilterto the appropriate filter or Media Type filter when neededsubtitleto Subtitlesession_typeto a filter when attendees should filter by parent-session typesession_trackto a filter when attendees should filter by parent-session track
- For a 9.3.9-or-later project whose abstract descriptions contain supported math, add the HTML and then Render LaTeX Math and Chemistry operations to the
descriptionmapping. - Select Next to run the import.
If the import reports excluded rows or invalid data, review Common Conference App Builder Import Data Errors and Import Exclusion Reasons.
Optional: Import LaTeX math and chemistry
EventPilot 9.3.9 and later can convert supported LaTeX-style equations and chemistry in imported Agenda and abstract descriptions. This optional feature is not supported by app packages earlier than 9.3.9.
The ScholarOne source must use explicit math delimiters:
- Inline math:
\(E=mc^2\) - Display math:
\[\frac{a}{b}\] - Chemistry:
\(\ce{H2O}\)or\[\ce{CH4 + 2 O2 -> CO2 + 2 H2O}\]
When mapping a description that contains this syntax, apply the HTML operation first and then Render LaTeX Math and Chemistry. EventPilot prepares the rendered content during import; do not add an external KaTeX script or stylesheet to ScholarOne content.
After importing, preview both an Agenda description and an abstract in the Conference App Builder. Publish to proof and confirm the result in the Web App and in iOS and Android apps generated from a 9.3.9-or-later package.
Important: LaTeX text-mode accent commands are not math expressions. For a name or prose word, enter the actual Unicode character, such as ö, instead of \"{o}. The math renderer only processes content inside the supported math delimiters.
Run later imports
- Open your project in the Conference App Builder.
- Choose the appropriate import action:
- To run every source, go to Home and select Import All Data.
- To run all sources for one data area, open that page and select its Import All action.
- To run one source, open its import card and select Import. When sources are related, import Sessions, Speakers, and Media together to avoid missing associations.
- Resolve any errors or excluded rows.
- Open Publish and select Publish to Proof.
- Review the updated sessions, speakers, abstracts, and any formulas in proof on the Web App, iOS, and Android.
- Select Publish Live Data after proof review is complete.
FAQ
Why is unexpected content appearing in a description?
The ScholarOne Session Notes field is included in the EventPilot session description. Project-specific customizations can also change how fields are combined. Ask your ATIV Project Manager to confirm the mapping and any customization assigned to your project.
I updated ScholarOne, but the change is not appearing. Why?
ScholarOne imports use a cached copy because the API has a strict rate limit. The cache is typically refreshed every 30 minutes, so a recent ScholarOne update may not be available immediately. If a change is urgent, you can temporarily edit the record in the Conference App Builder, but a later import can replace that manual edit.
How do I check when the ScholarOne cache was updated?
Go to Agenda > Sessions, expand the ScholarOne import card, select the pencil icon, and open the Data step. It displays the last cache update date and time.
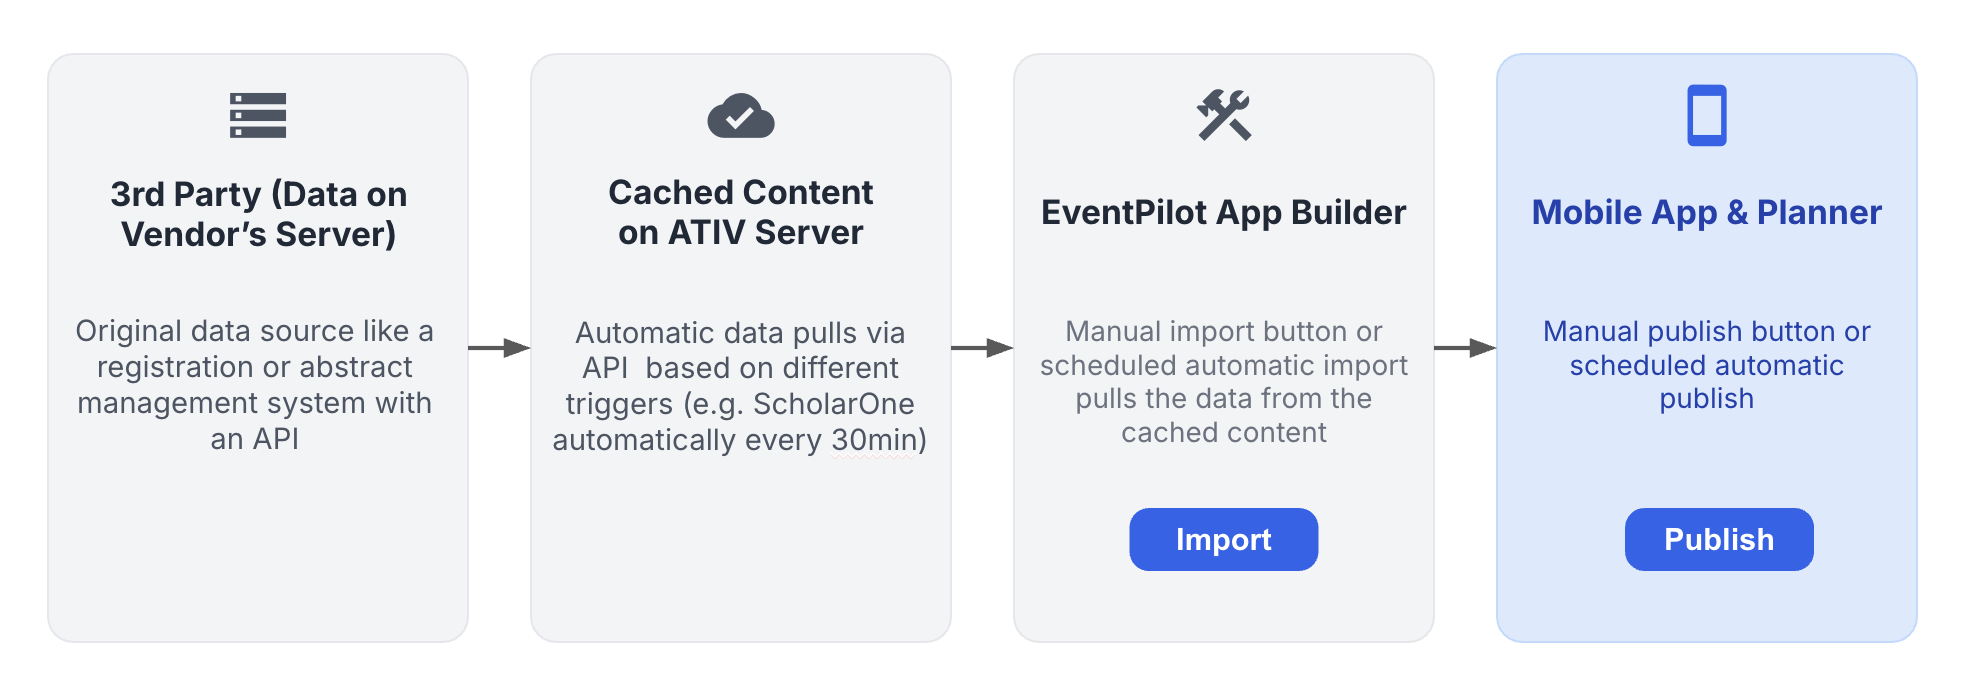
Why does the import use a cached dataset instead of requesting ScholarOne data immediately?
The ScholarOne API has a strict rate limit, so EventPilot maintains a synchronized copy of the ScholarOne data instead of downloading the entire dataset during every import.
Manual imports and automatic scheduled imports both use the latest available cached dataset. The cache is typically refreshed every 30 minutes, and ScholarOne changes become available after the next successful refresh.
Which parent sessions are imported?
- A scheduled session imports when ScholarOne Include in IP, also called
inIP, is on. - A session is excluded when Include in IP is off.
- An unscheduled session is excluded unless its session type identifies it as On Demand.
Which presenters and session hosts are imported?
By default, EventPilot links people whose ScholarOne invitation status is Accepted. To include another status, enter its exact value in Valid Invitation Statuses for both Sessions and Speakers. A child-session author must also be marked as a presenter in ScholarOne to be linked as the presentation's speaker.
What happens to withdrawn presentations?
A withdrawn presentation with a nonzero duration remains in the program with a (W) title prefix. Its Agenda description states that it was withdrawn, and its speaker and Media associations are cleared. This helps attendees understand an update without making a scheduled item disappear.
A withdrawn presentation with a duration of zero is excluded from the standard Agenda import and is not selected for the standard Media import. Ask your ATIV Project Manager before using a project-specific exception.
How do I exclude a canceled session before launch?
Turn off ScholarOne Include in IP before the next import. For a live event, discuss removal with your ATIV Project Manager first because attendees may already have the session in their schedules.
What should I do with LaTeX accent syntax such as \"{o}?
Use the actual character, such as ö, for names and normal prose. EventPilot 9.3.9+ LaTeX support is for delimited math and chemistry expressions; it does not turn text-mode accent commands into prose characters.
For real math or chemistry, keep the source command inside \(...\) or \[...\] and enable Render LaTeX Math and Chemistry on the description mapping. Earlier app packages do not support this rendered output.
Is every Session ID the same as a ScholarOne Control ID?
No. Imported presentations use the ScholarOne Control ID as their child Session ID. Parent sessions use the ScholarOne session ID. Do not assume that every parent-session identifier is a Control ID.
How do I control the order of presentations that start at the same time?
Map sessionNumber to Session Number. Learn more about sort order in this article.
Why is a session chair missing?
Confirm that each ScholarOne session host has a unique order value, such as 1, 2, and 3. Records with the same order can replace one another. Also confirm that the chair's invitation status is allowed by the import settings.
Can one presentation be assigned to two parent sessions?
No. Each imported presentation has one ID and one parent session. If the same content must appear under another parent, duplicate the presentation in ScholarOne and assign the duplicate to the second session.