m|events API - Before Getting Started
In order to set up new data sources that connect with the API, first contact your account manager to receive the following:
- Base URL generally https://api.us.m-anage.com
- API Username this would likely be m-events@ativsoftware.com
- API Password provided to you by your account manager
- EventID typically a 4 digit number e.g. 2601
- Event Shortcode likely your event abbreviation and the year e.g. abc2026
Once you have received the details, you will be able to set up Import Sources in the Conference app builder.
Access the menu item in the Conference App Builder where you would like to import data:
Agenda for session data
Speakers for presenters
Media for abstracts
Setting Up the Initial Data Sources and Running the Initial Import
Speakers
- Access the Conference App Builder (From our website, choose Organizer Login > EventPilot on the top right)
- Select your project
- Navigate to Agenda > Speakers
- Click Add Import Source (note: you may need to click the carrot to expand the import card before this button is visible)
- Enter a logical name for the source to indicate where this import is coming from e.g. M-Events API
- Tip: we recommend including the M-Events event ID in the name. When you clone your project in the future, you'll then easily know if you need to update your import source.
- Select M-Events from the Source dropdown
- Select Next
- As prompted on the screen, enter:
- Base URL
- API Username
- API Password
- EventID
- Event Shortcode
If you have used import customizations in the past, ask your ATIV Project Manager to add your Customization Code (generally your ORG ID in the App Builder) or Custom Import Parameters
Choose Yes or No to Link Co-Speakers (you can always go back and change this setting and try importing)
Select Next
Mapping
Complete the field mapping for the tableid > Speaker ID
firstname > First Name
last_with_creds > Last Name
email > Private Emali
bio > Bio
country > Filter 1
institute > organization
profileurl > URL
Next to run the import
If there are errors in your data, review: Common Conference App Builder Import Data Errors and Import Exclusion Reasons
Sessions
- Navigate to Agenda > Sessions
- Click Add Import Source (note: you may need to click the carrot to expand the import card before this button is visible)
- Enter a logical name for the source to indicate where this import is coming from e.g. M-Events API
- Tip: we recommend including the M-Events event ID in the name. When you clone your project in the future, you'll then easily know if you need to update your import source.
- Select M-Events from the Source dropdown
- Select Next
- As prompted on the screen, enter:
- Base URL
- API Username
- API Password
- EventID
- Event Shortcode
If you have used import customizations in the past, ask your ATIV Project Manager to add your Customization Code (generally your ORG ID in the App Builder) or Custom Import Parameters
If you wish to Display Disclosures in the session detail view, select Yes
If you wish to Link to Co-Speakers in the session detail view, select Yes
Select Next
Mapping
Complete the field mapping for the tableid > Session ID
number > Session Number
type > Session Type
title > Session Title
description > Description
room > location
Any commas added in the room or venue name are removed as those symbols are not supported for locations. Learn more in this article: Can I use symbols like slashes, semicolons, etc. for locations (rooms, booths), tracks and metadata? My pin drop or filter is not working?
date > Date
start > Start Time
end > End Time
parent > Parent Session
speakers > Speaker ID
If you have in your data: session_groups, presentation_type, presentation_category, you can map those to Filter 1, Filter 2, and Filter 3
Session location: You can choose to import just the room name or a concatenated version of the romance and venue name.
Next to run the import
If there are errors in your data, review: Common Conference App Builder Import Data Errors and Import Exclusion Reasons
Abstracts (Media)
- Navigate to Media > Media Data
- Click Add Import Source (note: you may need to click the carrot to expand the import card before this button is visible)
- Enter a logical name for the source to indicate where this import is coming from e.g. M-Events Abstracts
- Tip: we recommend including the M-Events event ID in the name. When you clone your project in the future, you'll then easily know if you need to update your import source.
- Select M-Events Abstracts from the Source dropdown
- Select Next
- As prompted on the screen, enter:
- Base URL
- API Username
- API Password
- EventID
- Event Shortcode
If you have used import customizations in the past, ask your ATIV Project Manager to add your Customization Code (generally your ORG ID in the App Builder) or Custom Import Parameters
Select Next
Mapping
Complete the field mapping for the tablemediaid > Media ID
sessionid > Session ID
title > Title
default_subtitle > Subtitle
type > Media Type
description > Description
default_filter > Filter 1
keywords > Filter 2
topic > Filter 3
sub_topic > Filter 4
embargo > Start
Next to run the import
If there are errors in your data, review: Common Conference App Builder Import Data Errors and Import Exclusion Reasons
ePoster PDF Links (Media)
- Navigate to Media > Media Data
- Click Add Import Source (note: you may need to click the carrot to expand the import card before this button is visible)
- Enter a logical name for the source to indicate where this import is coming from e.g. M-Events PDFs
- Tip: we recommend including the M-Events event ID in the name. When you clone your project in the future, you'll then easily know if you need to update your import source.
- Select M-Events Abstracts from the Source dropdown
- Select Next
- As prompted on the screen, enter:
- Base URL
- API Username
- API Password
- EventID
- Event Shortcode
If you have used import customizations in the past, ask your ATIV Project Manager to add your Customization Code (generally your ORG ID in the App Builder) or Custom Import Parameters
Fill in the Embargo Date field if your ePosters should not yet be viewed. The format is yyyy-mm-dd. For example 2027-03-15
Default Subtitle for example ePoster
Select Next
Mapping
Complete the field mapping for the tablemediaid > Media ID
sessionid > Session ID
title > Title
map subtitle > Subtitle if you entered a subtitle in the previous step. Otherwise map default_subtitle > Subtitle
type > Media Type
select type2 if the page must open in an external browser window
select type3 if the link can only be opened by logged in users
url > URL
default_filter > Filter 1
embargo_date > Start
Next to run the import
If there are errors in your data, review: Common Conference App Builder Import Data Errors and Import Exclusion Reasons
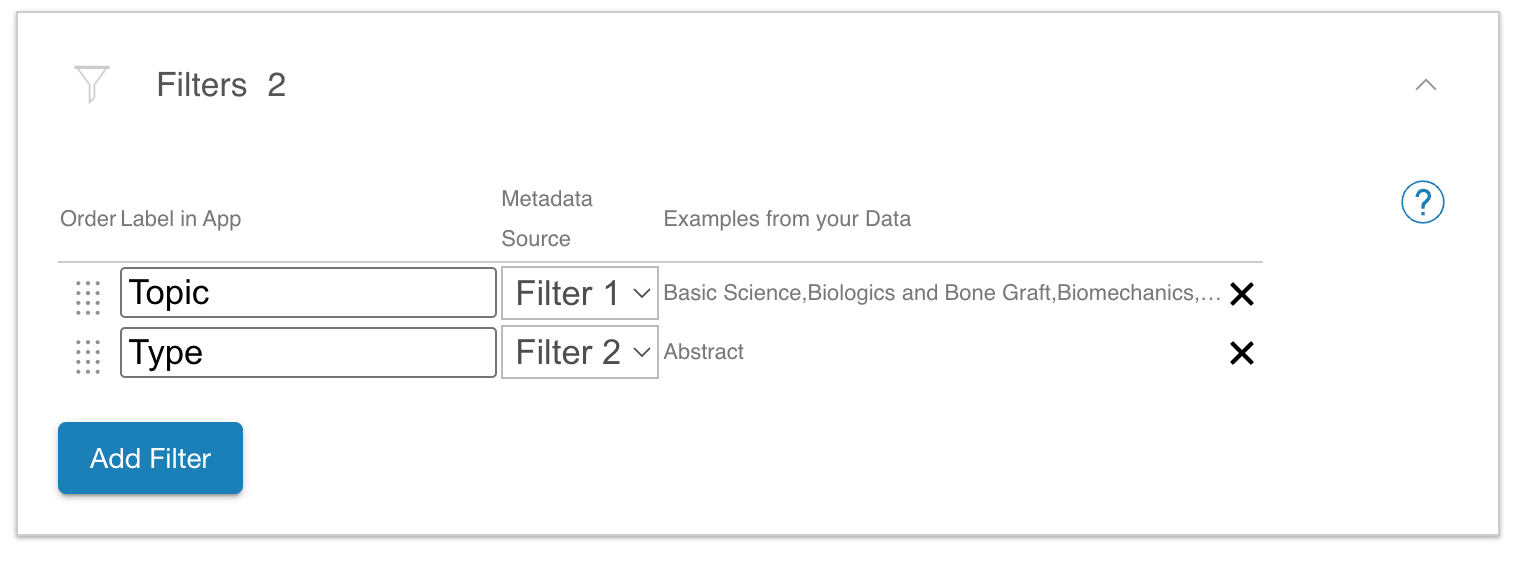
Filters
If you are importing filter keywords, ensure to open the filter card to:
- set the filter label
- adjust the filter display order
Incremental Imports after Setup
- Return to the Conference App Builder, log in, and access your project
- You have three different import options:
- Import all at once
Select the Home menu > Import All Data - Import one data set (e.g. just speakers or just sessions or just media)
To import all sources for a given table individually, visit that page of the Conference App Builder (e.g. Agenda > Sessions) and choose Import All [Agenda] - Import one source only
To import just one single source, visit that page of the Conference App Builder (e.g. Agenda > Sessions), expand the import card if necessary, and select the Import button beside a single data source
Note: If you manually import individual sources, ensure to import all related sources (Sessions, Speakers, Media) or you may be seeing orphans errors.
- Import all at once
- If there are errors in your data, review this article: Common Conference App Builder Import Data Errors and Import Exclusion Reasons
- Select the Publish Menu on the top left and Publish to Proof
- After reviewing your data update in the proof version on iOS and Android, you may publish to live by selecting Publish Live Data
FAQ
I have made changes in M-Events and imported but I am not seeing the content updated?
You may need to wait 15-30 minutes before your changes propagate into the API.
What triggers which sessions / presentations are imported into EventPilot from M-Events?
The Published field in Planstone must be set to true
What are the M-Events session (parent) and presentation (child) IDs in the EventPilot platform?
For parent sessions the Planstone Id field is "schedid" and for presentations (child) sessions, it is the "pslinkid" field.
How do I remove a session from Eventilot?
Set the Published field in M-Events to false and then reimport your data into EventPilot.